Physician Application Guide

Physician Application Guide
CEO Deok Jae Han

Use physician application in the following circumstances:
Management of confirmed patients in self-isolation
Management of confirmed patients hospitalized in residential treatment center
Management of confirmed patient hospitalized at quarantine ward (general room) designated by the country
Management of confirmed patients hospitalized in residential treatment center
Management of confirmed patient hospitalized at quarantine ward (general room) designated by the country
‘CheckUp Service’ is a medical service in which patients can report their symptoms and temperature using an application. Then, AI-based algorithms determine severity and triage of the patients and report to physicians, allowing non-face-to-face prognosis prediction monitoring.
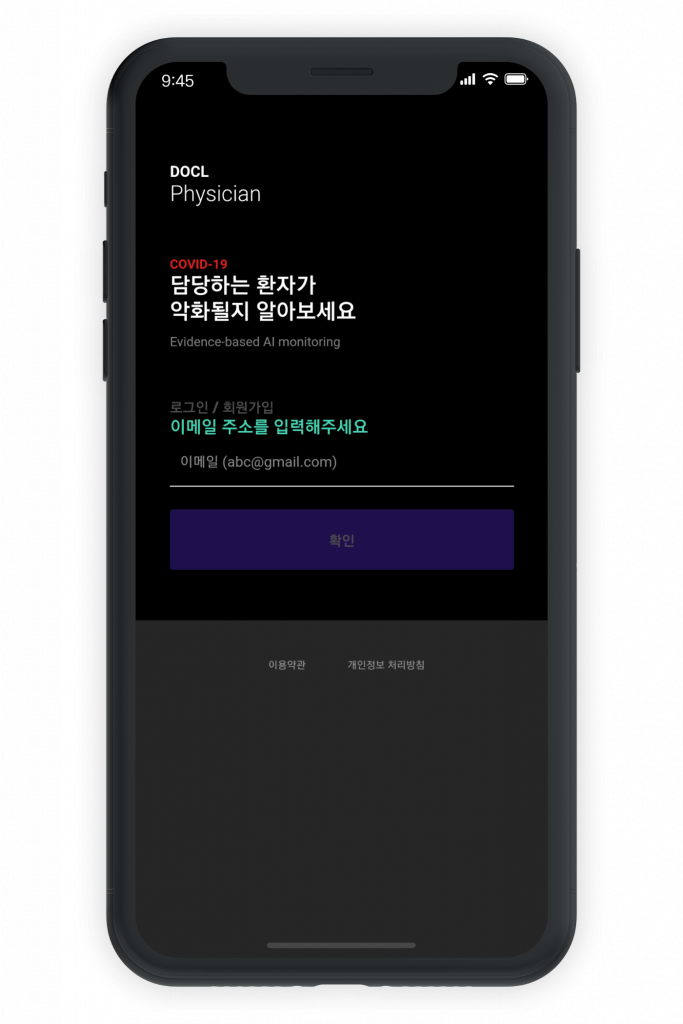
1. Log-in
1. Open the downloaded app.
2. Set up an account with your email address. The application will not ask for any other personal information.
3. The user can remain logged in after an initial log-in.
2. Set up an account with your email address. The application will not ask for any other personal information.
3. The user can remain logged in after an initial log-in.
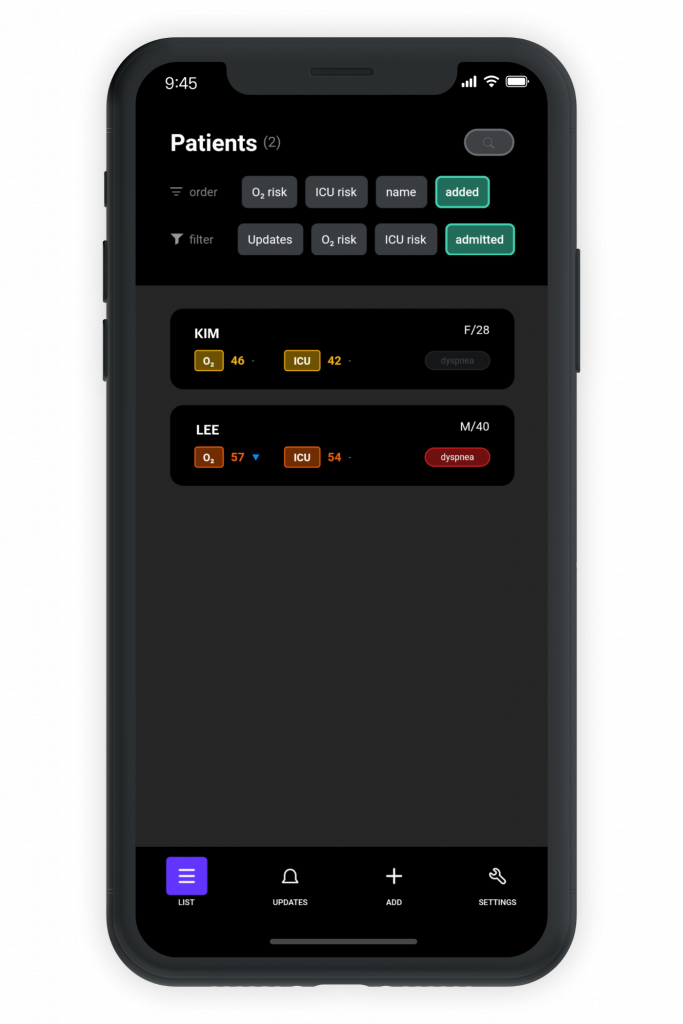
2. patient list
1. A patient list can be arranged, according to risk level, or name, or filtered.
2. The current risk level can be tracked from the patient list. The color of the number changes according to the risk level.
3. If a patient selects the item ‘dyspnea’ on the patient app, ‘dyspnea’ on the physician’s app is activated and turns red.
2. The current risk level can be tracked from the patient list. The color of the number changes according to the risk level.
3. If a patient selects the item ‘dyspnea’ on the patient app, ‘dyspnea’ on the physician’s app is activated and turns red.

3-1. Patient status information
1. Select a patient from the list to monitor the most recent symptom of the patient.
2. Select ‘close’ tab at the top to return to the initial list.
3.Select a ‘graph’ tab to identify a time series plot of each risk level.
4. The most recent risk level is quantified and can be checked.
2. Select ‘close’ tab at the top to return to the initial list.
3.Select a ‘graph’ tab to identify a time series plot of each risk level.
4. The most recent risk level is quantified and can be checked.
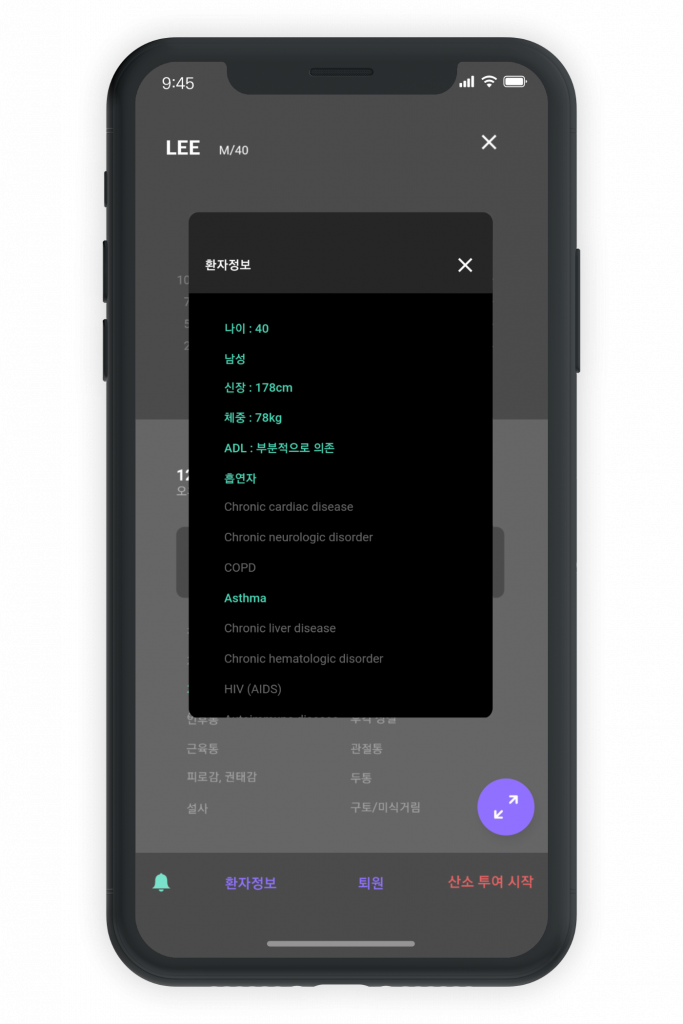
3-2. Patient status information
1. Select ‘Patient information’ to check the patient-entered data on the patient app for their basic information, underlying medical conditions or others.
2. Select ‘discharge’ to classify discharged patients into those with recovery or inpatients with exacerbation thus transferred to another ward or facility.
2. Select ‘discharge’ to classify discharged patients into those with recovery or inpatients with exacerbation thus transferred to another ward or facility.
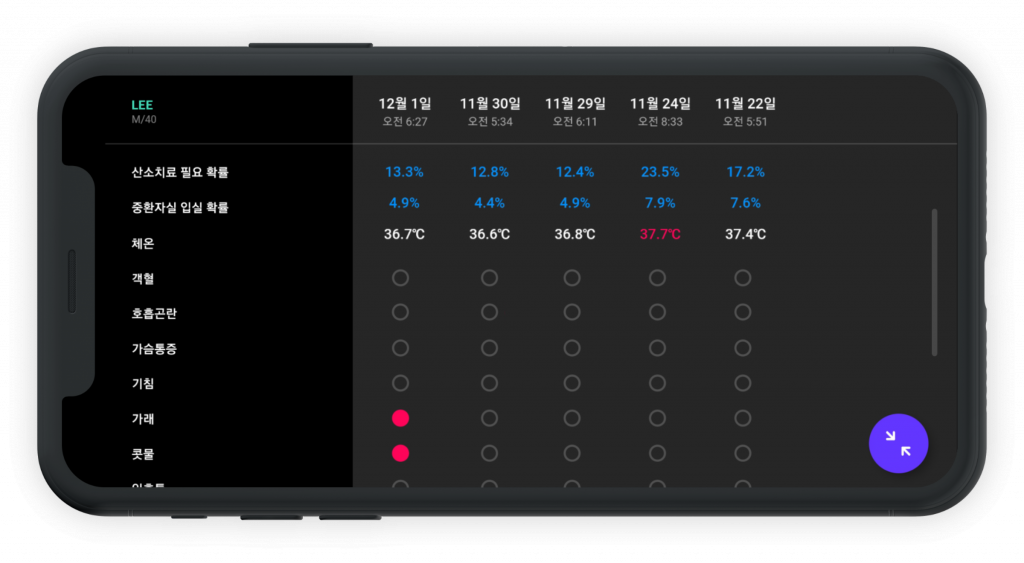
3-3. Patient status information
1. If you select ‘magnify’icon on the bottom, then the screen will change to a landscape position, and the time series data of risk level, temperature, and presence of symptoms from admission to most recent can be monitored.
4. Oxygen supply
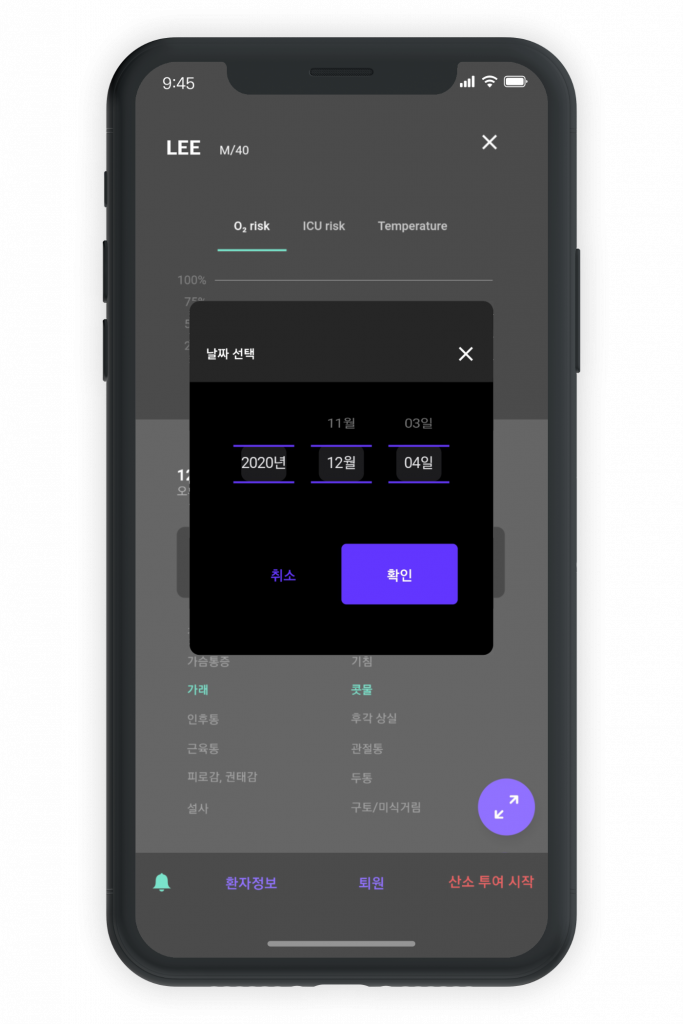
1.If patient status gets exacerbated and requires o2 supply, then select ‘start / stop O2 supply’ below to specify whether O2 will be supplied or not. The date of oxygen supply can be specified.
2. If supplying O2, check whether or not the item ‘O2 supply’ on the selected patient’s list is activated.
2. If supplying O2, check whether or not the item ‘O2 supply’ on the selected patient’s list is activated.
5. Notification
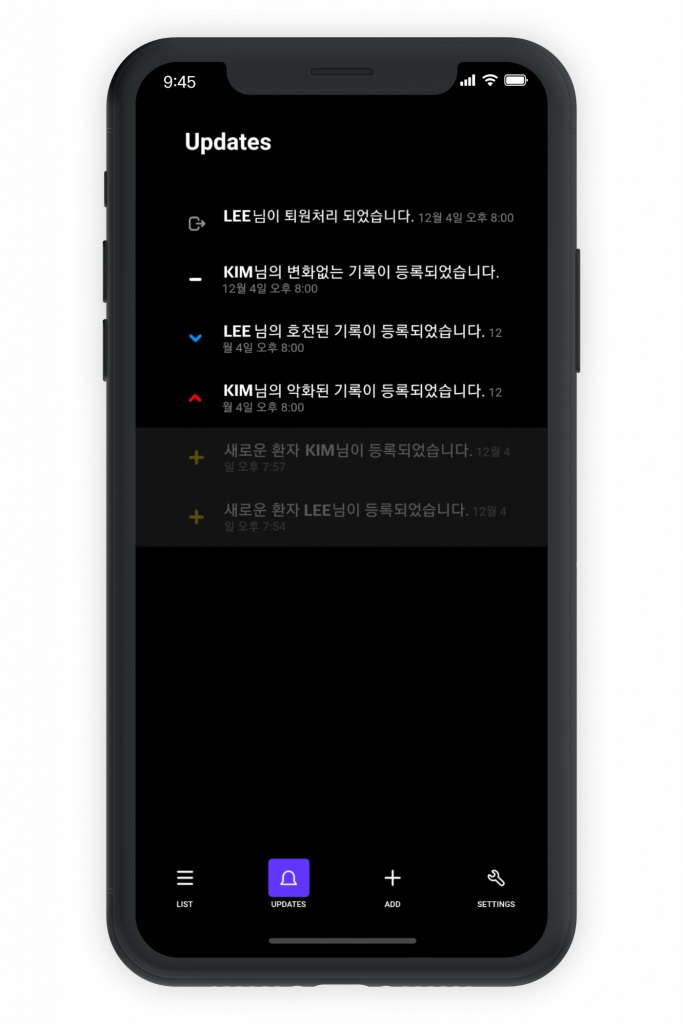
1. Select ‘updates’ to check patient notification in order. If patients enter their symptoms, the notification is automatically pushed and and can be checked in this tab if missed.
2. If you select an item, the screen will be switched to the window of the most recent status of the selected patient.
3. The checked item will turn black and white.
4. The ‘Updates’ tab will show the patient discharge status as well as patient information.
2. If you select an item, the screen will be switched to the window of the most recent status of the selected patient.
3. The checked item will turn black and white.
4. The ‘Updates’ tab will show the patient discharge status as well as patient information.
6. Patient registration
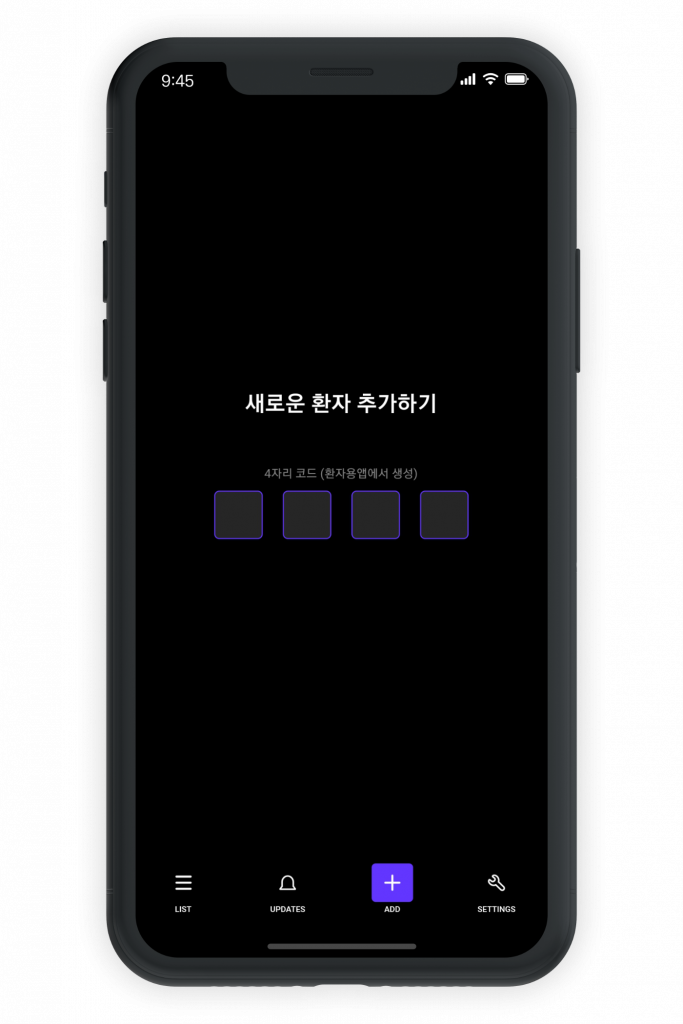
1. Select ‘add’ from the main screen to register new patients who are newly hospitalised, quarantined, or in need of real-time monitoring. Enter a unique 4-digit code created from the app for the patient to connect the information.
2. For discharged patients, go to ‘patient information’ for processing rehospitalization.
2. For discharged patients, go to ‘patient information’ for processing rehospitalization.
7. setting
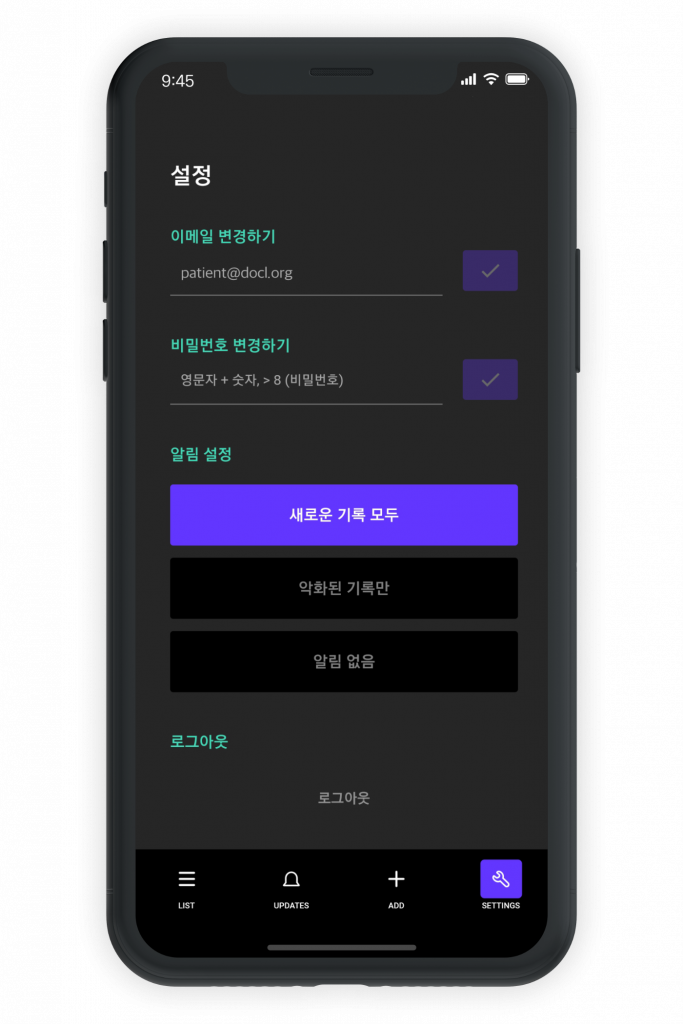
1. Select ‘settings’ at the bottom of the main screen to use various settings, including changing email address.

0 Comments